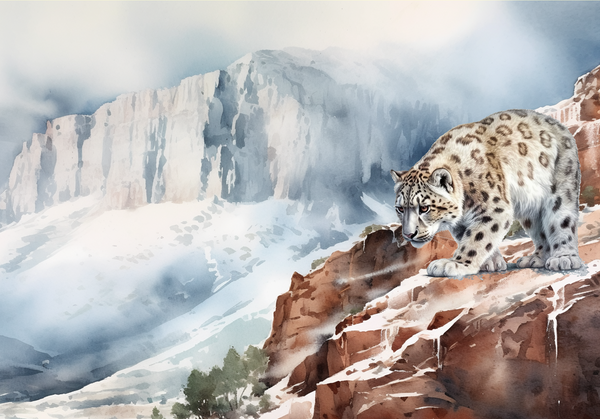
CREATING REALISTIC WATERCOLOR ANIMAL PAINTINGS
Creating realistic watercolor animal paintings requires a combination of technical skills, observation, and artistic interpretation. In this section, we will explore the key elements involved in achieving lifelike representations of animals in watercolor.
UNDERSTANDING ANIMAL ANATOMY
A fundamental aspect of creating realistic animal paintings is understanding animal anatomy. Having a solid grasp of the structure and proportions of the animal you are painting will help you accurately depict its form and movement.
Here are a few tips to enhance your understanding of animal anatomy:
- Study Reference Materials: Use books, photographs, and online resources to study the anatomy of the animal you wish to paint. Pay attention to the skeletal structure, muscle groups, and overall body shape. Understanding the underlying anatomy will enable you to portray the animal with accuracy and realism.
- Break It Down: Break down the animal’s body into basic shapes and forms. Start by sketching simple geometric shapes to establish the overall proportions and structure. Gradually refine your drawing by adding more details and defining the individual body parts.
- Focus on Key Features: Animals have distinctive features that define their species. Pay close attention to the eyes, ears, nose, mouth, and any unique characteristics of the animal you are painting. These features play a significant role in capturing the essence and personality of the animal.
- Observe from Different Angles: Study the animal from various angles to understand how its body changes in different positions and movements. This will help you depict the animal realistically and add depth to your watercolor painting.
By developing a strong understanding of animal anatomy, you will be better equipped to capture the essence and likeness of the animals you paint.
COLOR THEORY AND MIXING PIGMENTS
Color plays a crucial role in watercolor animal paintings. Understanding color theory and how to mix pigments will allow you to accurately represent the colors and tones found in animal fur, feathers, or scales.
Here are some key concepts to consider:
- Primary Colors: The primary colors in watercolor are typically red, blue, and yellow. These colors cannot be created by mixing other colors and form the basis for all other colors.
- Secondary Colors: Secondary colors are created by mixing two primary colors. For example, mixing yellow and blue creates green, red and blue create purple, and red and yellow create orange.
- Tertiary Colors: Tertiary colors are created by mixing a primary color with a neighboring secondary color. These colors offer a wide range of hues and are useful for capturing the subtle variations in animal coat colors.
- Color Temperature: Understanding warm and cool colors is essential for creating depth and dimension in watercolor animal paintings. Warm colors, such as reds and yellows, tend to advance and evoke feelings of warmth. Cool colors, such as blues and greens, recede and create a sense of calmness.
- Color Mixing Techniques: Experiment with different color mixing techniques to achieve the desired colors and tones. Wet-on-wet blending, layering, and glazing techniques can be used to create harmonious transitions and subtle variations in color.
By mastering color theory and pigment mixing, you will have the tools to accurately represent the rich and varied colors found in animal subjects.
CAPTURING TEXTURES AND FUR IN WATERCOLOR
One of the challenges of watercolor animal paintings is capturing the intricate textures and details of fur, feathers, or scales. Here are some techniques to help you portray textures convincingly in your paintings:
- Observation: Observe the texture of the animal’s coat or skin closely. Pay attention to the direction, length, and patterns of the fur or feathers. This observation will guide your brushstrokes and help you achieve the desired texture.
- Dry Brushing: Dry brushing is a technique that involves applying a relatively dry brush on dry paper to create texture and fine details. Use this technique to depict the roughness, softness, or sheen of animal fur or feathers. Vary the pressure and direction of your brushstrokes to create realistic texture.
- Splattering and Spraying: Splattering or spraying watercolor paint onto the paper can simulate the texture of fur or feathers. Use a toothbrush or spray bottle to create small droplets or speckles on your painting. This technique can add depth and visual interest to your animal subjects.
- Lifting Techniques: Lifting techniques involve removing wet or dry paint from the paper to create highlights or texture. Use a clean brush, sponge, or paper towel to lift off paint and reveal the underlying white of the paper. This technique can be effective for creating highlights on fur or feathers.
- Negative Painting: Negative painting involves painting around the subject to create the illusion of texture. By painting the spaces between fur or feathers, you can create depth and texture. This technique requires careful planning and layering of colors.
Experiment with these techniques to capture the unique textures and details of the animals you are painting. Remember to observe closely and let your artistic intuition guide you.
CREATING DEPTH AND DIMENSION IN ANIMAL PAINTINGS
Creating depth and dimension is essential for giving your watercolor animal paintings a three-dimensional feel. Here are some techniques to achieve depth in your artwork:
- Value Contrast: Value refers to the lightness or darkness of a color. By emphasizing contrast between light and dark areas, you can create a sense of depth and volume in your animal subjects. Pay attention to the light source and how it affects the shadows and highlights on the animal’s body.
- Layering and Glazing: Layering and glazing techniques allow you to build up transparent washes of color to create depth and dimension. Start with lighter values and gradually add darker tones to create the illusion of depth and form. Glazing with transparent colors can add richness and depth to specific areas of your painting.
- Foreground, Middle Ground, and Background: Consider the placement and size of your animal subject within the composition. By creating a sense of depth through the use of foreground elements, middle ground details, and background elements, you can give your painting a realistic sense of space.
- Atmospheric Perspective: Incorporate atmospheric perspective by using lighter and less saturated colors in the background of your painting. This technique mimics the natural effect of distant objects appearing lighter and less detailed, enhancing the sense of depth in your artwork.
By employing these techniques, you can bring your watercolor animal paintings to life, adding depth, dimension, and a sense of realism.
In the next section, we will explore advanced techniques such as the wet-on-wet technique, glazing, masking fluid, and dry brushing, to further enhance your watercolor animal paintings.
ADVANCED TECHNIQUES FOR WATERCOLOR ANIMAL PAINTINGS
Once you have a solid foundation in the basic techniques of watercolor animal paintings, you can further enhance your skills by exploring advanced techniques. In this section, we will delve into some techniques that can elevate your watercolor animal paintings to the next level.
WET-ON-WET TECHNIQUE
The wet-on-wet technique is a versatile and spontaneous method that can create beautiful and soft effects in your watercolor animal paintings. This technique involves applying wet paint onto a wet surface, allowing the colors to blend and create organic shapes and textures.
To use the wet-on-wet technique, start by wetting your watercolor paper with clean water using a large brush. Make sure the paper is evenly saturated but not overly soaked. Then, while the paper is still wet, apply diluted paint to create the desired effect. The wet surface allows the pigments to spread and blend naturally.
Experiment with different color combinations and observe how they interact on the wet surface. You can create soft transitions, subtle gradients, and fluid textures that beautifully depict the fur, feathers, or scales of your animal subject.
GLAZING AND LAYERING
Glazing and layering are techniques that involve building up multiple layers of transparent washes to achieve depth, volume, and richness in your watercolor animal paintings. These techniques are particularly effective for capturing the subtle variations and complexities of animal fur, feathers, or scales.
To use the glazing technique, start by applying a wash of a light, transparent color to the entire area you want to paint. Let it dry completely. Then, apply subsequent layers of progressively darker or more saturated colors, allowing each layer to dry before adding the next. This layering process creates depth and dimension in your painting.
Layering, on the other hand, involves applying multiple layers of wet paint without waiting for the previous layer to dry. This technique allows for more spontaneous and blended effects, particularly useful for capturing the softness and texture of animal fur.
Experiment with different combinations of colors and layering techniques to achieve the desired effects in your watercolor animal paintings. Building up layers gradually will create richness and complexity in your artwork.
MASKING FLUID AND RESISTS
Masking fluid and resists are useful tools for preserving specific areas of your watercolor animal paintings or creating intricate patterns and textures. These techniques involve applying a masking fluid or resist material to the paper before painting, which acts as a barrier to protect the underlying areas from being painted over.
Masking fluid is a liquid latex compound that can be applied with a brush or a ruling pen. It dries into a rubbery consistency, creating a protective layer on the paper. Use masking fluid to preserve highlights, whiskers, or other fine details in your animal subject.
Resists, on the other hand, are substances that repel water or paint. Common resist materials include wax, oil pastels, or even common household items like salt or plastic wrap. Apply these materials to the paper before painting, and they will create interesting textures or patterns as the paint interacts with them.
When using masking fluid or resists, make sure to apply them on completely dry paper. Once your painting is complete and the paint has dried, gently remove the masking fluid or resists to reveal the preserved areas or unique textures.
ADDING DETAILS WITH DRY BRUSHING
Dry brushing is a technique that involves using a relatively dry brush with minimal water and paint to create texture, fine details, and sharp edges in your watercolor animal paintings. This technique is particularly effective for adding fur details, whiskers, or other intricate features to your animal subjects.
To use the dry brushing technique, dip your brush lightly into the paint and remove excess moisture by dabbing it on a paper towel. Apply the brush with gentle pressure, allowing the texture of the paper to show through. This technique creates a scratchy, textured effect that adds depth and realism to your animal paintings.
Dry brushing can also be used to create sharp edges and define the contours of your animal subject. Use a small, pointed brush to carefully apply paint along the edges, emphasizing the shape and form of the animal.
Experiment with different brushes, pressures, and techniques to achieve the desired level of detail and texture in your watercolor animal paintings. Dry brushing is a versatile technique that allows you to add fine details and enhance the overall realism of your artwork.
In the next section, we will provide valuable tips and tricks to help you further refine your watercolor animal paintings, including creating strong compositions, mastering shadows and highlights, understanding the importance of values, fixing mistakes, and exploring different styles and approaches.
TIPS AND TRICKS FOR WATERCOLOR ANIMAL PAINTINGS
Mastering the art of watercolor animal paintings requires not only technical skills but also a keen eye for observation and creativity. In this section, we will explore valuable tips and tricks that will help you refine your techniques, enhance your compositions, and bring your watercolor animal paintings to life.
CREATING A STRONG COMPOSITION
A strong composition is essential for capturing the viewer’s attention and conveying the message or story of your watercolor animal painting. Here are some tips to create a compelling composition:
- Rule of Thirds: Divide your painting into a grid of nine equal parts by mentally drawing two horizontal and two vertical lines. Place the focal point or the most important elements of your painting along these lines or at their intersections. This technique creates balance and visual interest.
- Leading Lines: Use lines, such as the animal’s body, branches, or other elements, to guide the viewer’s eye through the painting. Leading lines can add movement and direct attention to the main subject of your artwork.
- Negative Space: Utilize negative space, the area around the subject, to create a sense of balance and emphasize the main focal point. Leaving areas of the painting less detailed or using a simple background can enhance the focus on the animal.
- Cropping and Framing: Experiment with different cropping and framing techniques to create a dynamic composition. Zoom in on certain parts of the animal or frame it within a natural environment to add depth and interest.
Remember to plan your composition before you start painting. Sketch out thumbnail sketches to explore different compositions and determine the most effective arrangement for your subject.
MASTERING THE ART OF SHADOWS AND HIGHLIGHTS
Shadows and highlights play a vital role in adding depth, volume, and realism to your watercolor animal paintings. Here are some tips to master the art of shadows and highlights:
- Observe Light Sources: Pay close attention to the direction and intensity of light in your reference photo. Determine where the light is coming from and how it creates shadows and highlights on your subject. Understanding light sources will help you accurately depict the three-dimensional form of the animal.
- Value Contrast: Create contrast between light and dark areas to emphasize the volume and form of the animal. Darken the shadows by using deeper, more saturated colors. Gradually lighten the areas hit by direct light, using lighter and more translucent washes.
- Gradation and Blending: Use gradation and blending techniques to smoothly transition from shadows to highlights. Gradually change the intensity and value of the paint as you move from dark to light areas. Soften the edges between shadows and highlights to create a more realistic effect.
- Reflected Light: Consider the presence of reflected light, which occurs when light bounces off surfaces and illuminates the shadow areas. This phenomenon can affect the color and value of the shadows. Incorporate subtle hints of reflected light to enhance the realism of your animal paintings.
By mastering the interplay of shadows and highlights, you can bring depth, dimension, and a sense of realism to your watercolor animal paintings.
UNDERSTANDING THE IMPORTANCE OF VALUES
Values refer to the lightness or darkness of colors. Understanding the importance of values is crucial for creating realistic watercolor animal paintings. Here are some tips to help you analyze and work with values effectively:
- Squinting Technique: Squint your eyes or view your reference photo from a distance to simplify the values. This technique allows you to see the overall light and dark areas more clearly. It helps you identify the key areas of contrast and establish a strong value structure in your painting.
- Limited Value Range: Consider using a limited value range in your painting to create a more impactful and cohesive artwork. By focusing on a narrow range of values, you can achieve a sense of harmony and unity in your watercolor animal paintings.
- Value Studies: Before starting your final painting, create small value studies to experiment with different tonal arrangements. This practice allows you to plan the distribution of values and ensure a strong composition.
- Gradation and Contrast: Utilize gradation and contrast to create depth and interest in your artwork. Gradually transition between light and dark values to create a sense of volume and form. Contrast between areas of light and dark adds visual impact and focal points.
Keep in mind that values are relative and depend on the surrounding colors and lighting conditions. By understanding and effectively controlling values, you can create depth, dimension, and realism in your watercolor animal paintings.
FIXING MISTAKES IN WATERCOLOR ANIMAL PAINTINGS
Mistakes are a natural part of the artistic process, but they don’t have to ruin your watercolor animal paintings. Here are some tips for fixing common mistakes:
- Blotting and Lifting: If you make a mistake or want to lighten an area, blot the wet paint with a clean, damp brush or a paper towel. You can also lift dry paint with a damp brush or sponge. Be gentle to avoid damaging the paper.
- Layering and Glazing: Use layering and glazing techniques to cover up mistakes or adjust values. Apply additional layers of paint to correct colors or create smoother transitions. Allow each layer to dry before adding the next.
- Masking Fluid: If you need to preserve specific areas or correct mistakes, masking fluid can be a valuable tool. Apply masking fluid to protect the desired areas, let it dry, and then paint over the protected sections. Once the painting is complete, gently remove the masking fluid.
- Artistic Adaptation: Embrace the opportunity to adapt and improvise. Sometimes, mistakes can lead to unexpected and interesting results. Use your creativity to turn mistakes into happy accidents and incorporate them into your artwork.
Remember that mistakes are a valuable learning experience. Don’t be discouraged by them, but rather embrace them as opportunities for growth and experimentation in your watercolor animal paintings.
EXPLORING DIFFERENT STYLES AND APPROACHES
Watercolor animal paintings offer endless possibilities for artistic expression. Don’t be afraid to experiment with different styles and approaches to find your unique voice as an artist. Here are some ways to explore different styles:
- Realistic Approach: Embrace a realistic approach by focusing on capturing the intricate details and textures of animals. Pay close attention to anatomy, colors, and proportions to create highly detailed and lifelike paintings.
- Impressionistic Style: Experiment with loose brushwork, bold colors, and expressive marks to create an impressionistic style. This approach emphasizes the mood, atmosphere, and overall essence of the animal rather than precise details.
- Abstract Interpretation: Explore abstract interpretations of animals by simplifying forms, using unconventional colors, or emphasizing patterns and textures. This approach allows for more experimentation and encourages personal expression.
- Mixed Media: Combine watercolor with other mediums, such as ink, pastels, or colored pencils, to add different textures and effects to your animal paintings. This approach can add depth and interest to your artwork.
Remember that finding your style is a journey of self-discovery. Allow yourself to explore, experiment, and embrace your unique artistic voice as you create watercolor animal paintings.
Incorporating these tips and tricks into your watercolor animal paintings will help you refine your techniques, enhance your compositions, and bring a sense of realism and creativity to your artwork. With practice and dedication, you will continue to grow as an artist and create captivating watercolor animal paintings.